
We installed a RIPE Atlas Anchor and saw immediate results!
Why We Wanted a RIPE Atlas Anchor
First, a quick description about who we are. We are BelWü, the academic network of the federal state of Baden-Württemberg (southwest Germany). Since the 1980s, we’ve used the IP protocol to connect universities and other institutions in our region to the Internet. Our backbone is more and more moving to a dark fiber network with our own optical equipment, yet we have more than 50 PoPs in our region. We are present at the DE-CIX and S-IX peering exchange, have several private peerings and buy upstream at two ISPs were we can shift traffic around. We are quite open regarding information about our network; for example, you can find our topology online .
Motivated by the last RIPE Meeting, I looked deeper into the RIPE Atlas project and thought that hosting an anchor could be interesting. First, you get more credits to perform your own measurements and second, the anchor performs some built-in measurements by the RIPE Atlas team at the RIPE NCC. So this is the perfect measurement box, run by a third party to show you and your customers how good (or bad) your network is performing. I thought, “Let's do this”!

Image 1: Setting up the anchor
Setting Up the Anchor
If you want to buy an anchor, you can choose either to buy the several hardware components on your own and plug them together or get the box as 1 HE server from Wim Vandeputte at KD85.com. We chose the latter.
The set-up procedure is simple: you give IPv4 and IPv6 addresses for the box to the RIPE NCC (don't forget reverse DNS) and get an image in return, which you put on a USB drive and boot the box, which then copies the data to the hard drive. Then you put the box in the data centre, plug it in and make sure it can communicate with the Internet – unfiltered, of course. That's all – you're done!
This was nothing fancy, at least for us. We are a small shop, so all the steps on our side were done by me. And the server is even so small that I could take it to the data centre with me on my bike on the way home. All of this is why the RIPE NCC praised me “for getting his anchor up and running within the shortest amount of time yet“. For us it's just another (black) box in our network.
Of course, there is a lot of work on the remote site. But the RIPE NCC is doing a great job! The procedures are clear and fast and they provide you with all the information you need and are very responsive when you need to ask something.
How We Used the Anchor to Debug Network Issues
So, the anchor was in place and the built-in measurements were running. What's next? With an anchor, you get a bunch of extra credits with which you can perform a lot of more of your own “user-defined measurements” (UDMs). And the demand for the first UDM didn't take too long.
As I said, our customers – we see them more as participants – are mainly universities and schools. A lot of the employees and students are connected at their home with Deutsche Telekom (DTAG/AS3320). So when they want to access their university’s website or VPN, we see a lot of traffic to and from the DTAG network. Therefore, it is important for us to have a good connection to DTAG. For some reason, we do not have a direct connection to DTAG, so we are pushing the traffic through a middleman ISP. Let's call this ISP A. This has been working for years now, without any complaints.
Shortly after installing the RIPE Atlas anchor, we changed this middleman ISP from ISP A to ISP B for financial reasons. Everything seemed fine – our own VPNs to the schools worked well and the traffic level to DTAG was quite similar to before (measured with NetFlow).
But then one participant started to complain. He observed very bad performance with an IPSec VPN from his home DSL connection within the DTAG network to the university VPN within BelWü.
So, how to debug? With our normal measurements ongoing, we could determine very fast that it was neither the university network nor the BelWü network. So, was it just him? Was it DTAG? The middleman ISP? Was it our announcement of changing the middleman ISP that triggered him?
When you need to debug end-to-end performance, you obviously need two end points. We are participating in NLNOG RING, so we have access to a fair number of hosts in other networks, but unfortunately not in the DTAG network. So here is the big benefit of RIPE Atlas: you have thousands of probes in a lot of networks. And those probes are so small that they are also distributed to normal users in their homes with DSL connections.
We wanted to know whether there was packet loss for connections from DTAG to the BelWü network. Was it for peak hours or every time of the day? And, would it disappear with a different middleman ISP? Ideally, this would be tested from several locations within the DTAG network and graphed over time.
So, we configured a ping measurement. With RIPE Atlas, you can select from how many probes the measurements should be performed. You can also select the sources based on ASN, country, area, etc. We decided to take 15 probes out of the DTAG network and, as reference, some probes out of a peer network to which we have a direct peering.
Image 2 below shows the output of the RIPE Atlas measurements. On the x-axis is the time and on the y-axis are the different probes. The lines are the relative increase in RTT, the yellow bars mean there is packet loss. And voila, one can clearly see there are times with packet loss! Looking at the last three days, the packet loss starts each day around noon and stops at midnight. And most of the DTAG probes are affected!
So we knew it was definitely time to try ISP A again. We changed the BGP policies so that traffic to and from DTAG travelled through ISP A. The dashed red line is at the time of the rerouting, which occurred at ~17:00 UTC. And the packet loss was gone.

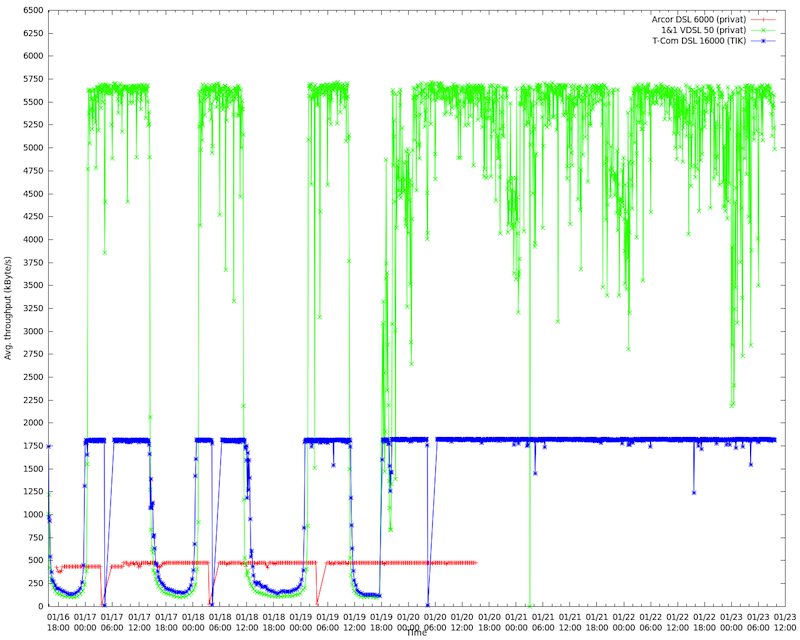
Interestingly, we had a highly skilled network engineer from the university who did a separate measurement with his own equipment. He collected the throughput (y-axis, in kbit/s) from his home DSL connection to the university and, as reference, from two other home DSL connections. In image 3 you can see his DSL connection (green), another DTAG DSL (blue) and the DSL connections from other ISPs (red). Both DTAG connections were affected: the throughput dropped to nearly zero beginning at noon and recovering at midnight. After rerouting (in the middle of the graph), the performance stays at its original level. (The short interruptions with the blue and red line are new IPv4 leases.)

Conclusions
Once again we saw that especially IPSec VPNs need a good quality Internet connection. And with RIPE Atlas, we could test this scenario using very little human resources in a short amount of time. It took me longer to write this article than to set-up the RIPE Atlas measurement ;-) Many thanks to Michela and Suzanne for their help! We got the results instantly and could change the parameters, such as how many probes from which networks we wanted. With RIPE Atlas you got a very good view of end-to-end performance. And, of course, we learned that ISP A is worth the money and ISP B isn't.
For me, the RIPE Atlas anchor is like thinking of measuring the time for a run: either you have a stopwatch or you don't. If you don't have a stopwatch, you cannot measure the time. If you want to measure the quality and latency of your Internet connectivity, you need a “stopwatch” for that. And that's the RIPE Atlas network – the perfect environment with thousands of probes around the world in all the different networks.
Comments 0
The comments section is closed for articles published more than a year ago. If you'd like to inform us of any issues, please contact us.