Ever wondered how to set up Pi-hole with your own recursive DNS server using DNSSEC? Here's how!
You probably know already the concept of the Pi-hole. If not, it’s a (forwarding) DNS server that you can install on your private network at home. All your clients, including every single smartphone, tablet, laptop, and IoT devices such as smart TVs or light bulb bridges, can use this Pi-hole service as their DNS server. Now here’s the point: it not only caches DNS entries, but blocks certain queries for hostnames that are used for ads, tracking, or even malware. That is: you don’t have to use an ad- or track-blocker on your devices (which is not feasible on smart TVs or smartphone apps, etc.), but you’re blocking this kind of sites entirely. Nice approach!
Yes, there are already some setup tutorials for the Pi-hole out there. However, it’s not only about installing the mere Pi-hole, but setting it up with your own recursive DNS server (since the default installation forwards to public DNS servers), using DNSSEC, and adding some more adlists. That’s why I am listing my installation procedure here as well. However, it’s not a complete beginners guide. You’ll need some basic Linux know-how.
I am using a Raspberry Pi 3 B+ Rev 1.3 with Raspberry Pi OS for this setup. (While in the meantime I’m running Pi-hole on my Intel NUC with Ubuntu server.)
Basic Setup
This installation is copied from the original Pi-hole documentation:
git clone --depth 1 https://github.com/pi-hole/pi-hole.git Pi-hole
cd "Pi-hole/automated install/"
sudo bash basic-install.sh
Well, that was easy. It will ask you some questions though. Note the lines at the end about your admin password and how to access the console:
[i] Web Interface password: Q_1kJLS9
  [i] This can be changed using 'pihole -a -p'

  [i] View the web interface at http://pi.hole/admin or http://192.168.7.53/admin
Own Recursive DNS Server and DNSSEC
By default, Pi-hole uses some public DNS servers for its name resolution. I don’t like that concept because you’re giving 100 % of your queries to some third parties. I prefer using my own recursive DNS server. (Yes, I know that your upstream ISP is still able to see your queries, but that’s by far better than using 8.8.8.8 or the like.) The recursive DNS server of choice is Unbound. The following installation procedure is covered on the Pi-hole site as well.
sudo apt update
sudo apt install unbound
While this installation is working, the Unbound service is not able to start yet because the UDP/TCP port 53 is already used by Pi-hole. You have to use an adapted config anyway:
sudo nano /etc/unbound/unbound.conf.d/pi-hole.conf
Paste these lines:
server:
    # If no logfile is specified, syslog is used
    # logfile: "/var/log/unbound/unbound.log"
    verbosity: 0

    interface: 127.0.0.1
    port: 5335
    do-ip4: yes
    do-udp: yes
    do-tcp: yes
    do-ip6: yes

    # You want to leave this to no unless you have *native* IPv6. With 6to4 and
    # Terredo tunnels your web browser should favor IPv4 for the same reasons
    prefer-ip6: yes

    # Use this only when you downloaded the list of primary root servers!
    # If you use the default dns-root-data package, unbound will find it automatically
    #root-hints: "/var/lib/unbound/root.hints"

    # Trust glue only if it is within the server's authority
    harden-glue: yes

    # Require DNSSEC data for trust-anchored zones, if such data is absent, the zone becomes BOGUS
    harden-dnssec-stripped: yes

    # Don't use Capitalization randomization as it known to cause DNSSEC issues sometimes
    # see https://discourse.pi-hole.net/t/unbound-stubby-or-dnscrypt-proxy/9378 for further details
    use-caps-for-id: no

    # Reduce EDNS reassembly buffer size.
    # Suggested by the unbound man page to reduce fragmentation reassembly problems
    edns-buffer-size: 1472

    # Perform prefetching of close to expired message cache entries
    # This only applies to domains that have been frequently queried
    prefetch: yes

    # One thread should be sufficient, can be increased on beefy machines. In reality for most users running on small networks or on a single machine, it should be unnecessar>
    num-threads: 1

    # Ensure kernel buffer is large enough to not lose messages in traffic spikes
    so-rcvbuf: 1m

    # Ensure privacy of local IP ranges
    private-address: 192.168.0.0/16
    private-address: 169.254.0.0/16
    private-address: 172.16.0.0/12
    private-address: 10.0.0.0/8
    private-address: fd00::/8
    private-address: fe80::/10
Restart and verify the running service:
sudo systemctl restart unbound
sudo systemctl status unbound
Since the DNS from Unbound is now running on port 5335, use this command to test it:
dig pi-hole.net @127.0.0.1 -p 5335
And since DNSSEC validation is turned on, you should see the “ad” flag for a DNSSEC signed FQDNs, while a “SERVFAIL” for DNSSEC errors:
dig sigok.verteiltesysteme.net @127.0.0.1 -p 5335
dig sigfail.verteiltesysteme.net @127.0.0.1 -p 5335
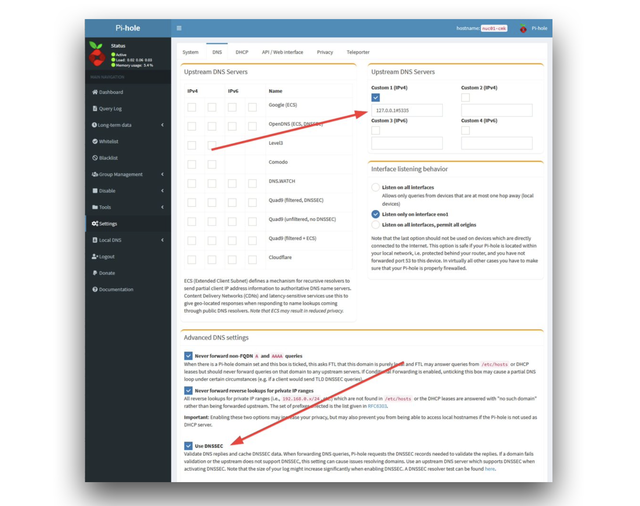
Use this DNS service within Pi-hole by enabling it in this way:
Including More Lists Automatically
Right now you are using one single ad-list on your Pi-hole. While that’s a good starting point, you definitely want to add some more lists. Note that once a list is added, Pi-hole will automatically update the list entries. What we are doing right now is to automatically add more lists in general. Two steps are required for this:
1. A script that checks a “list of lists” in order to add them into the Pi-hole
I am using this, pihole-updatelists:
sudo apt update
sudo apt-get install php-cli php-sqlite3 php-intl php-curl

wget -O - https://raw.githubusercontent.com/jacklul/pihole-updatelists/master/install.sh | sudo bash
Note the two last lines during the installation:
Enabling and starting pihole-updatelists.timer...
Created symlink /etc/systemd/system/timers.target.wants/pihole-updatelists.timer  /etc/systemd/system/pihole-updatelists.timer.
2. Adding a “list of lists”
You first have to choose such a list. Keep in mind that you must trust the source of this list! I have chosen “The Firebog” project which lists some lists out of the following categories: suspicious, advertising, tracking and telemetry, malicious. All the lists that are checked (ticked) from their site are listed here: https://v.firebog.net/hosts/lists.php?type=tick. Haha, how many times have I said “lists”? ;)
Add this “list of lists” to the pihole-updatelists configuration like this:
sudo nano /etc/pihole-updatelists.conf

ADLISTS_URL="https://v.firebog.net/hosts/lists.php?type=tick"
That’s it. You can either wait till next Saturday to have it updated, or you do it manually for this first time (of course!) with the following command:
pihole-updatelists
After that you’ll see some more configured adlists at Group Management -> Adlists:
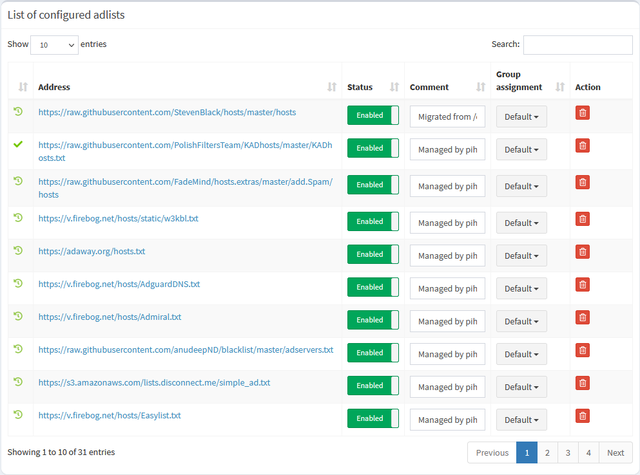
While the “Domains on Blocklist” counter at the upper right should increase significantly as well. In my case, it’s greater than 250.000 entries. Nice!
Miscellaneous
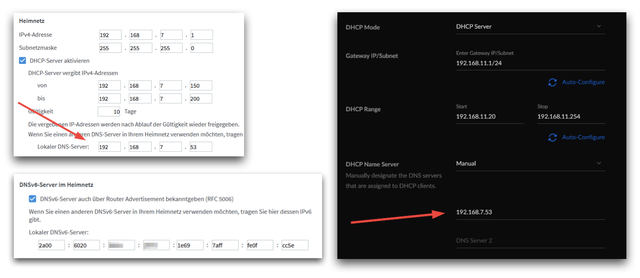
By the way: Don’t forget to change your DHCP settings on your router to use the Pi-hole as the DNS server. ;) In the snaphots here, you can see what it looks like on an AVM Fritzbox (IPv4 and IPv6) and on a Ubiquiti UniFi network (top, middle, bottom image respectively):
Here’s a little pitfall I ran into at least two times: If your Pi has no valid time (e.g. when it was offline for a couple of days), while you’re using DNSSEC (as I do!), you’ll have a chicken-and-egg problem. The NTP service won’t be able to lookup its NTP server addresses because of DNSSEC failures (due to the wrong time), while DNSSEC will never be able to validate DNS responses unless NTP corrects the local time. Arg! The only way to solve this is to manually correct the time on the pi with: sudo date -s '2021-01-04 13:04:00', click for details. If you’re interested in the DNSSEC validation process on the Pi-hole, read this: “Understanding DNSSEC validation using Pi-hole’s Query Log“.
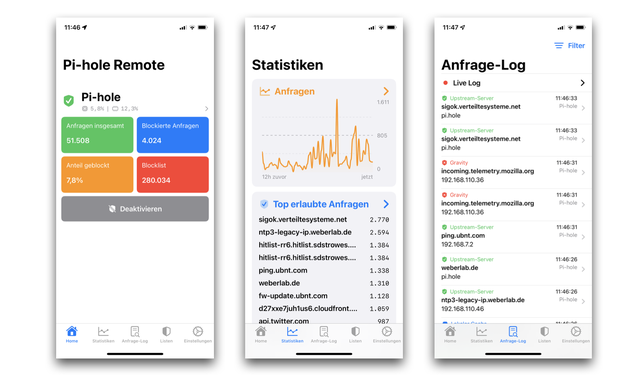
Final tip: I recommend the free Pi-hole Remote App for iOS. It works like a charm and is completely ad-free. Wow. You can donate through in-app purchases, though, which I recommend as well. Here as some screenshots:
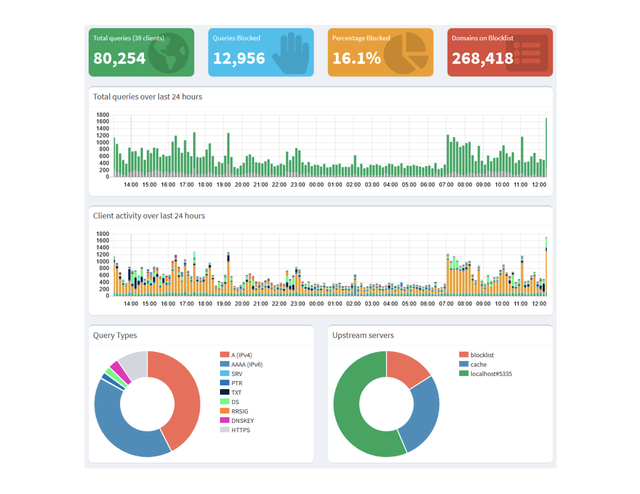
I’m ending this story with a screenshot from my Pi-hole dashboard. I really like it:
Originally published over on Weberblog.net.


Comments 0
The comments section is closed for articles published more than a year ago. If you'd like to inform us of any issues, please contact us.