
At RIPE 70, Tim Bruijnzeels presented some statistics on the type of authentication people use to update the RIPE Database. There was one data point that particularly stood out for me: 76% of all updates via email are done using an MD5 password. I was stunned, because this way you are required to send your password in clear text over the Internet...
The alternative to using MD5 passwords is to authenticate with Petty Good Privacy ( PGP ), which is much safer. I wondered why PGP usage for email updates is relatively low; it's only used in a quarter of all the email updates. I figured it would be because perhaps it's hard to set up and use. I normally only use my RIPE NCC Access (SSO) account to update the RIPE Database via syncupdates on the website , so I don't have a lot of experience using PGP or email updates. So I decided to try it out for myself, to see how difficult it is and if there is a way we can improve the experience.
The theory of it is pretty simple: you generate a PGP key pair, publish the public part in the RIPE Database and sign your updates with the private part. The RIPE Database verifies your signed update using the public key it has, and accepts it if everything checks out.
To get my hands dirty, I installed the GnuPG package and walked though the basic steps of creating a key from the command line. First, I simply ran:
gpg --gen-key
I chose an RSA 4096 bit key and 4 year expiry, set my name and email and wiggled my mouse around for some entropy. Done.
Next, I needed to export the public key so I can put it in the RIPE Database. To do this, simply ran:
 gpg --export --armor
 hallo@alexband.nl
 > alexband-pub.asc
The file gave me 52 lines of PGP key-glory. Perhaps 4096 bits was overdoing it just a little, because now I have to put all of this in the key-cert object I'm about to create. Oh well... For now, I'm only going to care about the mandatory attributes in the object. As the "method:", "owner:", and "fingerpr:" attributes are generated from the public key itself, I'm just left with these required elements:
 key-cert:  [mandatory] [single]   [primary/lookup key]


 certif:    [mandatory] [multiple] [ ]


 mnt-by:    [mandatory] [multiple] [inverse key]


 changed:   [mandatory] [multiple] [ ]


 source:    [mandatory] [single]   [ ]
Seeing that the "changed:" attribute is going to be deprecated pretty soon and the "source:" is always RIPE, this all looks pretty manageable. I already have a maintainer in the RIPE Database, so I just need to refer to it in this object. That leaves me with just two other variables that I need to specify; the key-id for the "key-cert:" attribute and the 52 lines worth of public key that I need to put in a long list of "certif:" attributes.
To get the key-id for my public key, I entered:
gpg --list-keys "Alex Band"
In the public key section, the key-id is the string of eight characters after the key length (in my case D868BAC0):
 pub 4096R/

  D868BAC0

 2015-05-07 [expires: 2019-05-07]
Now we've got all the puzzle pieces to create a key-cert object. The most annoying part of this process was pasting "certif: " in front of all the public key lines. I'd really like to improve this, but other than that it's all pretty painless. All that's left is to refer to my shiny new key-cert object in my maintainer with an additional "auth:" attribute and we're ready to roll.
Signing your updates can be done in various ways. From the command line, all you'd have to do it to put your RIPE Database updates in a text file – here I used update.txt – and sign it by entering:
gpg --clearsign update.txt
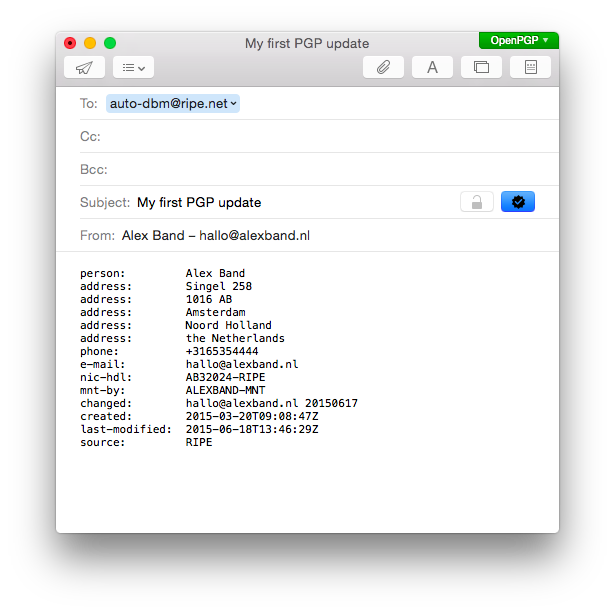
After typing your passphrase, this will give you a signed version of your update.txt file, named update.txt.asc. Now you can submit it via email to auto-dbm@ripe.net , or even via syncupdates if you like. With a bit of scripting fanciness you can also automate this process.
Alternatively, you can install a plugin for your favorite email client to make signing your updates easier. There are many plugins available for pretty much all popular platforms and mail clients. On my Mac, I installed GPGTools which gives you a suite of handy tools to manage your keys. It also gave me a plugin for Mail, so I can now sign updates by just clicking the appropriate icon an send it to the Database robot.

Once I had this set up, updating the RIPE Database with email and PGP became so easy that I might start using it for everything. Most importantly though, sending an email update signed with a PGP key is going to be much safer than having to submit a clear text password.
Still, I intend to make the creation of a key-cert object easier. When managing a maintainer on our website, you should be able to just select "Add PGP Key", which would give you a dialog that looks something like this:

Then, simply specify the two required elements and we do the rest for you. Stay tuned for that! In the mean time, give PGP a spin to keep your updates safe.


Comments 3
The comments section is closed for articles published more than a year ago. If you'd like to inform us of any issues, please contact us.
Gavin Henry •
Very handy. Thanks. Just added my key too.
Johannes Löthberg •
How's the nicer dialog coming along? ;)
Alex Band •
Ah yes Johannes, this is one of those things that slowly slides down the priority list due to the ever increasing amount of the web interface users with SSO (currently almost 30,000 maintainers with SSO that are actively used) and the continuing decline of email for updates. It's on the list for sure, but there are many other things that are simply more valuable right now.