
Recently, we launched a new e-learning course on IPv6 security in the RIPE NCC Academy. This course helps you learn about the theoretical concepts behind IPv6 security, and you will also have a chance to practice some attacks and protection against them on your own computer. In this post, I will describe how this virtual activity lab environment works.
If you ever attended any of our training courses, you may have had a chance to play with our virtual lab activities — a couple of routers interconnected in various scenarios that you can play with using just your web browser. It works pretty well, but there are some drawbacks:
- The capacity is limited to just a few participants as real routers are emulated on our hardware
- You cannot take the labs home - everything is deleted once the training course is over
For e-learning, we were looking for a way to overcome these limitations as the number of concurrent users can easily go up into the hundreds and the time spent on the lab activities can go beyond just a few hours. Instead of trying to overcome these limitations by putting in more computational power - for instance, by means of cloud computing - we are trying something else: running the whole environment directly on the participants’ computers.
Delivering a Virtual Machine

The idea is to provide an image of a pre-configured virtual machine that anybody can download and run. Virtualisation is now pretty common and available on almost all computers running Windows, macOS, or Linux. Unfortunately, each platform comes with different technology when it comes to running virtual machines.
To address this, we decided to use Vagrant. Vagrant is an open source multi-platform tool that automates setting up, configuring and destroying of virtual machines, mostly for development purposes. It supports all three major platforms (Windows, macOS and Linux) as well as several virtualisation technologies. By default, Oracle VM VirtualBox is used, as this virtualisation technology is available on all three platforms.
Containers
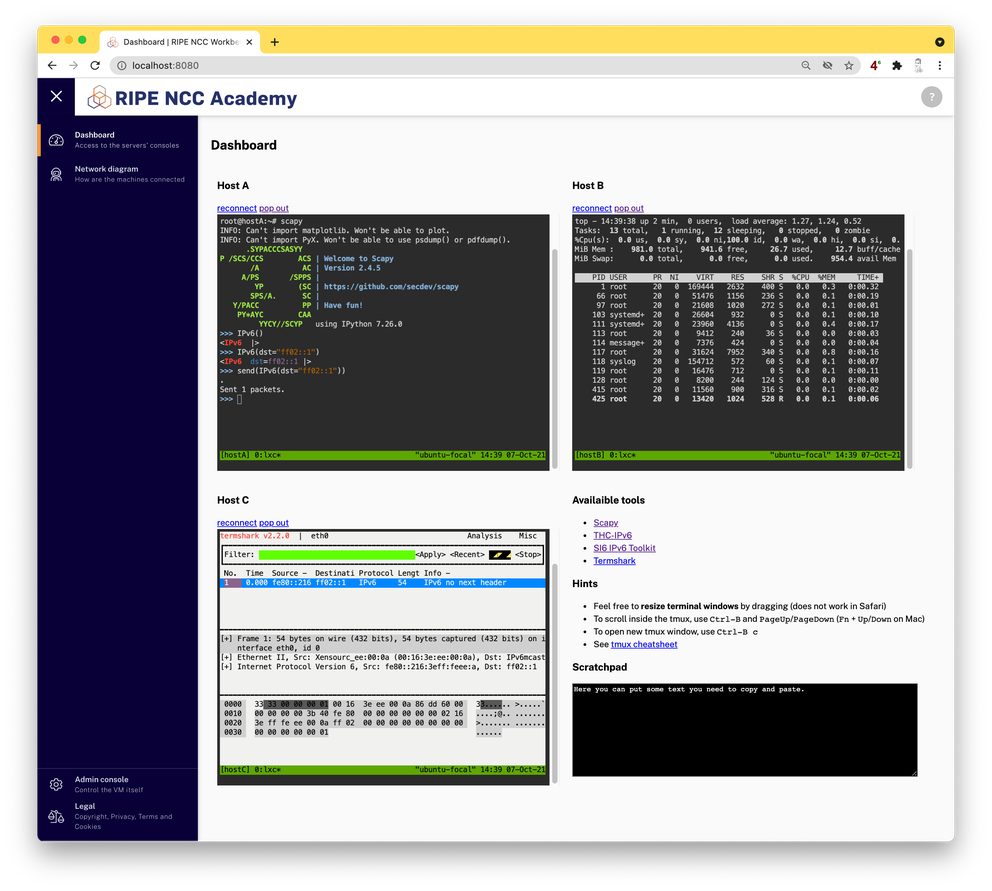
Using Vagrant and VirtualBox, we can easily deliver a working virtual machine. The next step is to make sure the virtual machine contains the software needed for the IPv6 security training course. In this case, we work with three Linux servers connected to one network segment — one in the role of an attacker, one as the victim and one as an observer. To run these three servers inside one virtual machine, another virtualisation technology is used: containers.
Using containers reduces resource consumption, avoids problems with nesting virtualisation technologies and allows easy communication between the host and the guests. We decided to use LXD to manage the containers.
Delivering Linux Terminals into a Web Browser
One thing we wanted to avoid when delivering the lab environment as a virtual machine was having to work directly with the console of the virtual machine. As we are targeting a global audience, there is no common keyboard layout, nor screen resolution or PPI value. Operating a virtual machine console is therefore often clumsy and/or requires lots of per-user customisations.

Instead, we run the virtual machine headless and provide a web-based interface on a loopback port redirected into the virtual machine. Therefore you can interact with the labs using your own web browser, configured to your own preferences.
There are three software packages that allow displaying terminal windows in a web browser: Gotty, written in Go; WeTTy, written in Node.js; and finally ttyd, written in C. All work in a similar way so choosing one over another is more or less a question of personal taste. We've chosen ttyd.
All three packages work in a similar fashion, they run a HTTP server and whenever a browser connects to it a WebSocket is opened between the JavaScript terminal running in the browser and a particular linux process (like shell) specified on the command line. Once the WebSocket connection is interrupted, the connection to the process is lost, if two connections are started at the same time, two instances of the process get started. This would make it a bit impractical because if you for instance accidentally close or refresh the browser window, all work would be lost.
Fighting Tmux Not To Do Too Much
Tmux is a generic software that can be used every time you don’t want to lose your work when you (accidentally) lose your linux terminal. By making ttyd run tmux which in turn runs the shell, we can be sure that no matter how many times you connect from your web browser, you will still be connected to the same terminal session maintained by tmux. You can even open the terminal twice and see the same content in two places. But this solution also has its drawbacks.

First, if terminals are of different sizes, the bigger one will have a lot of unused space filled with dots. But most importantly, tmux implements its own scroll-back buffer and turns off the native scroll buffer of the terminal itself. This is pretty inconvenient, as people not familiar with controlling tmux cannot easily scroll up.
We overcome this limitation by downgrading to an older version of tmux together with some configuration adjustments. This makes it easy to just scroll up using the mouse wheel and copy and paste when necessary. At the same time, tmux’s internal scroll-back buffer is still there and can be accessed by pressing a sequence of Ctrl-B and PageUp.
Putting Everything Together
The whole lab environment uses just open source software. It starts with a generic image of Ubuntu Virtual Server deployed by Vagrant. Then, Ansible is used to install all the necessary components and do all the necessary configuration. Then a new virtual machine image is created and pushed into the Vagrant Cloud so that all you have to do is to install Vagrant and VirtualBox and then in an empty folder, issue following commands:
vagrant init ripencc/ipv6seclab
vagrant up
In a minute, it should be possible to open a web browser and point it to http://localhost:8080/ to see the environment.

Contributions are Welcome
All the code that powers this lab is published in RIPE NCC’s GitHub repository. Feel free to give it a try and if you see a room for improvement, feel free to open an issue.
Also, don't forget to follow the brand new IPv6 Security e-learning course RIPE NCC Academy.


Comments 0
The comments section is closed for articles published more than a year ago. If you'd like to inform us of any issues, please contact us.